Saturday, July 30, 2011

Wavy nine-patch blocks sewn in rows

Rows sewn
Close-up

I just finished the last row of wavy nine-patch blocks. They look good. I’m a bit concerned that some of the rows are a bit narrower than others. I’ll have to think about how I’ll deal with them.
Next I’ll begin sewing the rows together.

Design notes

Wednesday, July 27, 2011

Just a little scare

I learned at a meeting at work today that co-worker Wanda will be retiring soon. Panic! How soon? I asked. February. Okay, I can relax again. I was planning to get Wanda’s quilt done in the next month or so. At least she isn’t leaving next week, as so many other co-workers have left the office recently with little notice.

I have several fabrics but no design nailed down yet. I found a medallion style pattern in a quilt magazine that showed striped fabric as an outer border. A pink and white stripe is a big player in Wanda’s quilt and I’m seriously considering using it as the outer border for the project. We’ll see.

Monday, July 25, 2011

Sewing blocks together in rows

Re-arranged blocks so similar sizes were in each row.

Measured each block, added about 1/2" to those dimensions to cut oversized background pieces.

Curve cut on edge of nine-patch

Overlapped edge of background, cut along curve.

Background and nine-patch sewn together

First row sewn

I had been putting off sewing together the wavy nine-patch blocks. But I finally gathered my courage and tackled it last night. I re-arranged a few blocks so that there are similarly sized ones in each row. Then I measured each block and added a little extra to get the dimensions of the plain alternating blocks which are made up of the starfish fabric. Fortunately there was enough of the starfish to fill each space, with just a handful of scraps leftover.

I sewed together the top row of blocks. They look pretty good. Tonight I’ll do some more. I’m getting kind of excited to see the finished quilt top!


Design notes

Date chosen for seminar

The Creativity seminar for Skillpath is coming to Sacramento in late August. The seminar is on a Wednesday but since I have lots of vacation time available I arranged to get the whole week off from work.

I may drive up the day before and stay the night rather than fight early morning traffic. I’m waiting for the next discount offer to arrive in my email, then I’ll pay for the class.

Thursday, July 21, 2011

Wavy blocks sewn

Wavy nine-patch blocks

Close-up
Last night I finished the last of the 18 wavy nine-patch blocks. They are in various sizes and I really don’t know how I’m going to set them together yet. I’ll play with them on the design wall until I like the layout. The alternating plain squares will be a cute starfish print—leftover fabric from one my granddaughter’s quilts. I’m thinking about cutting oversized squares and rectangles so I have options for trimming and cutting curves.

I’m kind of excited about the quilt. Part of the fun is not knowing how it will look at the end.

By the way, while looking for a beach in Ireland with a name that would tie together the Irish chain block and starfish fabric, I learned that there is a place called Quilty Beach! I’ve got to work that into the quilt’s title somehow.

Making the Wavy Nine-Patch Blocks

Going through scrap drawers for fabrics

Tower of scrap drawers. 12" x 12" x 3" drawers.
Drawers are filled with fabric widths of: 2.5+", 3.5+", 4.5+", 6.5+", 9"-13".
Warm colors on one side, cool colors on the other.  Rolled up paper divides the two.

Whites, pinks, greens pulled as possibilities.

Trying different combinations against starfish background.
Dark green against pink is my favorite.

Trying out a couple more combos.  Prefer the dark pink (dots) against the light green.

Got rid of the white.  Divided scraps into light/dark pinks and greens.


Design notes

Reviewed Ricky Tims' Caveman Quilting DVD, very helpful.
Stacking fabrics right sides up.

Make a curved cut with rotary cutter.  Any gently curved shape is okay.

Hmm.  The green looks way too skinny.

This will work better.
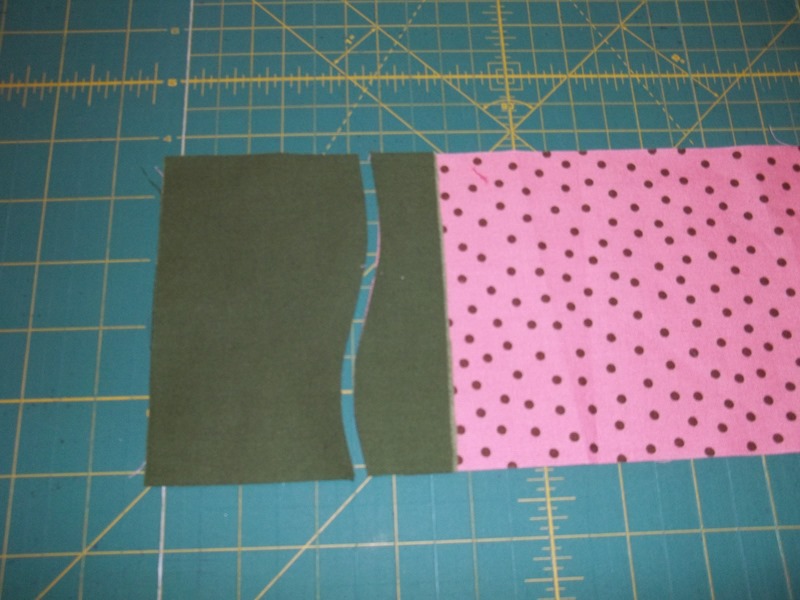
Sewn, trimmed pink.

Cut a curve on the outside edge of the pink.  Place it on a new piece of green (right side up), overlapping the edge a little.  Cut along the pink's curve so the green has the same shape.

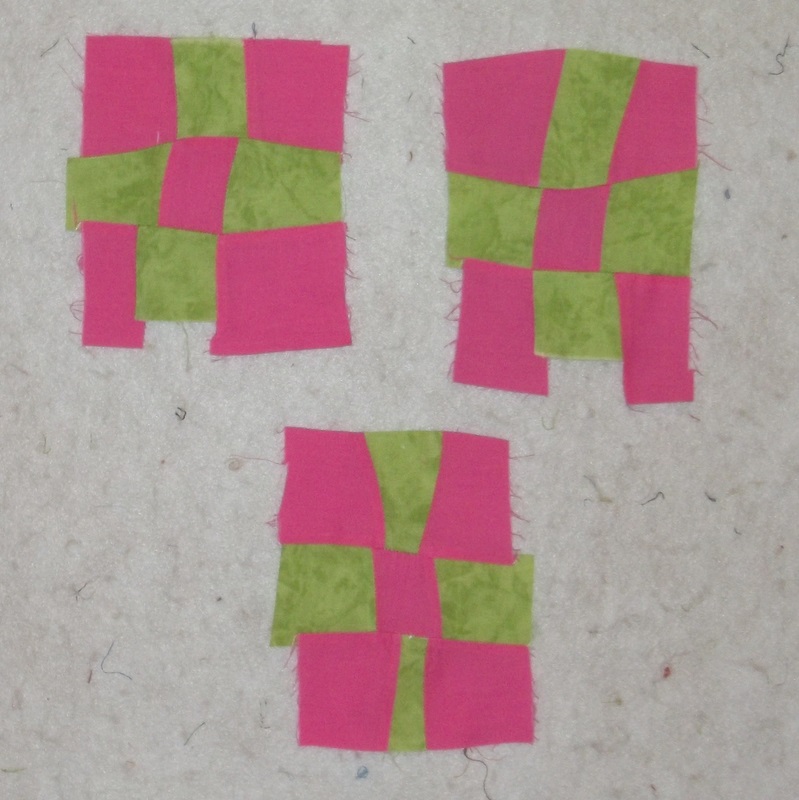
Green-pink-green unit sewn

Pink-green-pink unit

Both units

Made another green-pink-green unit.

Stacked two units, made a cut, paired up for sewing.

Pairs sewn together

Remaining green-pink-green unit sliced, overlapped edge where it will be joined, and trimmed to match--always cutting right sides up.

Two nine-patches done.  Final trimming will be done later when quilt top is assembled.

Set 1

Set 2

Blocks with bright pink X's are Set 3. (Must have forgotten to take a separate photo.)
Checking out progress so far.  Looks good.

Strip set on bottom seems really narrow, need it to complete a block.

Added a little pink to the edge.
As it turned out, I removed the extra pink because I didn't need it.

Set 4
Note I had to add a different green in the top right nine-patch because there wasn't enough fabric.

Set 5

Here's the whole collection.  This isn't necessarily the layout.

Design notes


See the finished quilt here.

Wednesday, July 20, 2011

Making waves

A few days ago I began working on a wavy Irish Chain, nine-patch blocks done with all curved lines. I’ve been wanting to do an Irish Chain wallhanging for a while, and I read about an Irish challenge at Fast Friday Fabric Challenge. Although I’m not part of the group, I thought I’d give it a shot. I reviewed Ricky Tims’ Caveman Quilting DVD, which helped me brush up on the freeform rotary cutting technique.

Trying out different background fabrics.  Like the center starfish fabric best.
Some pink and green scraps were calling me the other day so that became my color scheme. Sunday I created nine wavy nine-patches with pink background and green X’s. Monday I started working on nine more nine-patches; these are in the opposite coloring. I found a cute pink starfish print leftover from one of my granddaughter’s quilts. I’ll use that as the plain alternating squares – wavy, of course. Hopefully no one gets seasick looking at my quilt!

Design notes

Friday, July 15, 2011

How to make cowboy quilt

Cowboys
For Ryan, who loved cowboys
Simplified Premium Star blocks
Original design
59" Square
Partly from stash

Close-up

Back

"I'm really glad I made this quilt."

How I did it: Ryan, the 8-year-old son of co-worker Sharon, is a very sick little boy.  I wanted to make a quilt for him.  Although Sharon is on leave to care for Ryan, I was able to get in touch with her to ask about making a quilt.  I found out that Ryan likes cowboys and his favorite colors are purple, blue and yellow.  He especially likes purple and yellow because he and his dad like the Vikings.

I couldn't find any purple cowboy fabric, but I was able to find a cowboy print in yellow, a lasso print in tan, and a light purple star print.  I had lots of purples in my stash, including a print that reminded me of barbed wire, and another that looked like snakeskin, both of which seemed to fit the cowboy theme.  To tie both colors together I added a button fabric in multi colors against a brown background.

I found I could get four 10.5" cuts from each width of cowboy fabric so I chose Premium Star, a five-patch block which works well for the 10" finished size.  The block looks similar to a Bear's Paw block, with small triangles on the edges that look like claws.  To make the piecing easier and faster, I modified the block by removing the triangles.

I alternated the simplified Premium Star blocks and large plain blocks of cowboy fabric.  I added a narrow border of button fabric, then a wide border of dark purple.  I did a pillowcase finish, top-stitched all around the edges of the quilt, then tied with embroidery floss.

I called Sharon yesterday and told her that the quilt was finished.  I'll be taking the quilt to Ryan today.  I hope he'll like the quilt, and that the quilt will bring a bit of cheer to him.

Lessons & tips: When you get a prompting to do something nice for someone, follow it.

Keep an open mind when looking for fabrics for a theme.  You may not find exactly what you're looking for, but with a little creativity you can make other possibilities work.  The barbed wire was actually vines.  But it worked in my head, and that was enough.

Design notes


Update:  I took the quilt to Ryan on Friday, July 15.  He seemed to like it and his mother Sharon really appreciated me making the quilt.  Sadly, Ryan lost his battle with cancer on July 16, just one day after I delivered the quilt.  My heart goes out to his family.

Resources: Electric Quilt quilting program

It took me 10 days.

It made me Glad