Wednesday, July 31, 2013

Ho Ho Ho Christmas Blog Hop

Welcome to my blog! I'm so glad you stopped by. I'm delighted to participate in the Ho Ho Ho Christmas Blog Hop. Be sure to check the end of the post for the giveaway.

SantaCard Gift Card
"You've been a good quilter this year."
Original design
4" x 5.5"
Completed 7/30/2013

Originally I thought of the idea of creating an imitation American Express gift card, which I re-named American Expressive. After I talked with good friend Sharon E., she suggested I bring in the element of Christmas in July. That set me off to search for pictures of Santa on the beach.

This is a photo I found online, then cartoonized it and added text at BeFunky.com. I used the same cartoonizing technique in Corky the Corgi from the Think Christmas Blog Hop a year ago.

Next I created a couple of overlapping circles that look similar to the MasterCard logo, then added silver tops to make ornaments. I changed the brand to SantaCard, calling it a gift card, rather than a credit card, since I am a cash-only purchaser.

I use June Tailor's printable fabric sheets, but couldn't find any at home. I had saved the sticky backings from an earlier project and decided to give them a try with regular untreated cotton fabric from stash.

Sticky paper backing placed on fabric

Fabric trimmed even with the backing

Printout - larger images

Second printout - wallet sized
I may finish a few of these as gifts for quilter friends.

During printing the fabric slipped off the backing by about 1/4", but I didn't see much wrinkling.

Also, there are some faint black lines running through most of the images. My printer is pretty new and this was my first attempt at printing on fabric with it. I still don't know what created the lines.

I needed fabric for the back and remembered this candy cane-like fabric from TC's Christmas, also in the Think Christmas Blog Hop.

Backing, batting, top held together with quilting spray glue

As seen from the back - no noticeable wrinkles

Sides trimmed

All edges trimmed

Zigzagged around the edges with light gray thread to seal.

Did a little bit of quilting with invisible thread.

View of the back

One of the finished SantaCards


Now for the giveaway. You could win the "other" SantaCard below.

Note there are lots of faint lines running across the piece, but it's still darned cute. And, to be clear, the card is just for fun. You won't be able to purchase anything with it.

For a chance to win the quilted SantaCard shown above, simply leave a comment by the end of Sunday, August 11. For an extra chance to win the card, leave another comment mentioning that you are a new or existing follower OR that you have Liked my Facebook Page. The winner will be drawn on Monday, August 12.

Be sure to stop by and see today's other Blog Hop participants:

August 1
Traveling Quilter - You're Here!

Full Schedule
Thanks to Carol and Madame Samm for another great blog hop!

Debbie
Like my Facebook page Traveling Quilter and get more updates on my quilting and my travels.

Thursday, July 25, 2013

WIP Wednesday 7/24/2013


Above: Scrappy Blocks
Green and teal scrappy strips sewn together any old way

On Saturday I traveled to Sacramento to attend the monthly Sacramento Modern Quilt Guild meeting. I got to see friend and first-time visitor Marilyn L. (North Hills Quilter). I showed off the Boston Common quilt top, as well as plans for the Fourth of July quilt and a tropical quilt. 

After the meeting I had lunch at Cheesecake Factory, then spent some time at Barnes and Noble Bookstore. In one of the books I read that it's good to have a ritual before beginning a creative session. I decided to try sewing some scraps together for 15 minutes as my ritual. I did it twice, and the results are seen in the photos above. The jury is still out on whether I'll keep up the ritual. It's nice, but since I start sewing so late, I got little done on the Fourth of July quilt that I'm currently working on.

Star pattern from Electric Quilt
Printed on plain paper, then traced onto junk mail card stock
For the Fourth of July quilt

Wonder Under fusible web
Someone gave me several packages of this. Looks old, but it works.

Fusible web placed on back of white-on-white print


Fused fabric

Tracing star pattern to fused fabric

Tried pencil, but rubbery texture of webbing made tracing difficult. Used pen, will cut inside the line to prevent seeing a dark line on the edges.

Traced 13 stars

Rough cut one star

Star cut, inside the dark outline

Star placed on blue square and fused into place

Scrap to practice zigzag stitching

Pretty happy with this
I reduced the width and length of the zigzag to sew around the actual star.

Zigzag stitching done. I like it.

View from the back

I'll finish the other 12 star blocks, then sew them together, alternating with plain blue blocks. Red and white stripes will be created, using a quilt-as-you-go technique. I'd like to have most of the quilt done by the end of the weekend.

Debbie
Like my Facebook page Traveling Quilter and get more updates on my quilting and my travels.

Friday, July 19, 2013

Boston Common - Fast Patch Tutorial

I am a big fan of non-traditional quilting techniques. If it's a little bit weird, I'm interested.

Fast Patch by Anita Hallock

Many years ago I bought the quilting book Fast Patch by Anita Hallock. She demonstrates a technique of sewing regular horizontal blocks, making a couple of diagonal cuts, then sewing the pieces back together to form an on-point block. Here is the basic technique:

Start with a horizontal block.

Cut along the diagonal.

Take the left side and bring it to the top.

Sew together.

Make a second diagonal cut.

Second cut

Bring the cut piece to the bottom right.

Sew together.

Ta-da! Now you have an on-point block.

The book demonstrates lots of variations, along with plenty of blocks that can be made using the technique.

Boston Common quilt top

I made the Boston Common quilt top above at least ten years ago. I'm not exactly sure how I got the idea to make a Boston Common design using the Fast Patch technique. For several years I hosted a Yahoo Group called QuiltSwapChallenge, where I presented design challenges to an international group of quilters. It's possible the Boston Common was my answer to one of the challenges. Or it could have been that I just got a crazy idea to take the Fast Patch technique to a level not shown in the book. Whatever the case, I'll try to show how I made the design. I was able to find some notes and sketches, but not all of them, so I've tried to fill in with recreations.

Here are some 10+-year-old sketches - experiments to see what colors would land where.

This is basically the same demonstration as above.

Playing with a different horizontal grid, seeing where the pink and blue lines would land.

Taking the on-point result from the previous picture, colored and labeled (Desired Result). Re-assembled into the horizontal grid (Layout). 

So, to end up with the on-point design on the left, I would have to sew the horizontal design on the right, exactly like it. Expanded, I could do the same to make the multi-colored Boston Common.

I was unable to find the colored layout for the Boston Common. But I found these experimental sketches:
I don't think this is the actual on-point design, as the real quilt top has many more pieces.

This is probably the horizontal sewing layout for the on-point design above. Cutting diagonally through the dark squares and reassembling, it would probably create the on-point design.

I don't even know what this is, but it was with the other sketches so I'm showing it.

On to making the Boston Common. I'm sure I would have started with a colored sketch of the Boston Common. I don't have (or can't find) the drawing, so I recreated the actual finished quilt top in Electric Quilt.

Electric Quilt Sketch of finished Boston Common quilt top

By examining the back of the actual quilt top I was able to find the continuous seams, shown by the dark lines on the printed sketch above.

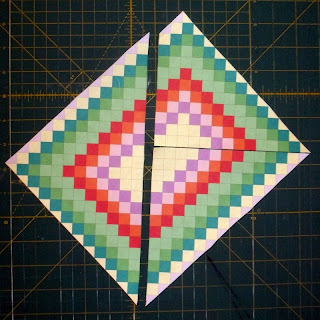
Using the printed Electric Quilt sketch, I cut along the "seam" lines.

Cuts made

Top left section moved to the bottom

Top right piece moved to the left

Here is the horizontal layout for sewing.

Better view of the layout
It has to be sewn exactly like this. It can't be off by even one square or the finished design will be off. If you've done counted cross-stitch you know what I'm talking about.

Alright. Days later, I have my horizontal quilt top sewn together. Now comes the scary part...cutting on the diagonal. Once you make a cut, there's no going back. I'm sure I was nervous and checked the placement of the cutting lines many times. I don't think I would have used a rotary cutter, opting for scissors instead, and I probably drew the cutting lines with a water-soluble marker.

First diagonal cut

Take the top left piece, sew it to the bottom.

Second cut

Take the piece and sew it to the left.

All sewn together

Better view

Here is my finished result. I imagine I breathed a big sigh of relief when the pattern came together just as I planned.

Debbie
Like my Facebook page Traveling Quilter and get more updates on my quilting and my travels.