I am a big fan of non-traditional quilting techniques. If it's a little bit weird, I'm interested.
Fast Patch by Anita Hallock
Many years ago I bought the quilting book Fast Patch by Anita Hallock. She demonstrates a technique of sewing regular horizontal blocks, making a couple of diagonal cuts, then sewing the pieces back together to form an on-point block. Here is the basic technique:
Start with a horizontal block.
Cut along the diagonal.
Take the left side and bring it to the top.
Sew together.
Make a second diagonal cut.
Second cut
Bring the cut piece to the bottom right.
Sew together.
Ta-da! Now you have an on-point block.
The book demonstrates lots of variations, along with plenty of blocks that can be made using the technique.
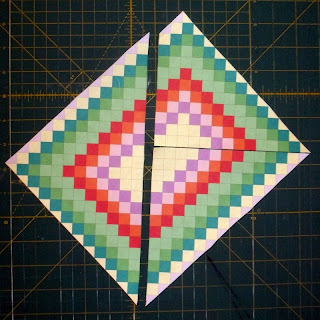
Boston Common quilt top
I made the Boston Common quilt top above at least ten years ago. I'm not exactly sure how I got the idea to make a Boston Common design using the Fast Patch technique. For several years I hosted a Yahoo Group called QuiltSwapChallenge, where I presented design challenges to an international group of quilters. It's possible the Boston Common was my answer to one of the challenges. Or it could have been that I just got a crazy idea to take the Fast Patch technique to a level not shown in the book. Whatever the case, I'll try to show how I made the design. I was able to find some notes and sketches, but not all of them, so I've tried to fill in with recreations.
Here are some 10+-year-old sketches - experiments to see what colors would land where.
This is basically the same demonstration as above.
Playing with a different horizontal grid, seeing where the pink and blue lines would land.
Taking the on-point result from the previous picture, colored and labeled (Desired Result). Re-assembled into the horizontal grid (Layout).
So, to end up with the on-point design on the left, I would have to sew the horizontal design on the right, exactly like it. Expanded, I could do the same to make the multi-colored Boston Common.
I was unable to find the colored layout for the Boston Common. But I found these experimental sketches:
I don't think this is the actual on-point design, as the real quilt top has many more pieces.
This is probably the horizontal sewing layout for the on-point design above. Cutting diagonally through the dark squares and reassembling, it would probably create the on-point design.
I don't even know what this is, but it was with the other sketches so I'm showing it.
On to making the Boston Common. I'm sure I would have started with a colored sketch of the Boston Common. I don't have (or can't find) the drawing, so I recreated the actual finished quilt top in Electric Quilt.
Electric Quilt Sketch of finished Boston Common quilt top
By examining the back of the actual quilt top I was able to find the continuous seams, shown by the dark lines on the printed sketch above.
Using the printed Electric Quilt sketch, I cut along the "seam" lines.
Cuts made
Top left section moved to the bottom
Top right piece moved to the left
Here is the horizontal layout for sewing.
Better view of the layout
It has to be sewn exactly like this. It can't be off by even one square or the finished design will be off. If you've done counted cross-stitch you know what I'm talking about.
Alright. Days later, I have my horizontal quilt top sewn together. Now comes the scary part...cutting on the diagonal. Once you make a cut, there's no going back. I'm sure I was nervous and checked the placement of the cutting lines many times. I don't think I would have used a rotary cutter, opting for scissors instead, and I probably drew the cutting lines with a water-soluble marker.
First diagonal cut
Take the top left piece, sew it to the bottom.
Second cut
Take the piece and sew it to the left.
All sewn together
Better view
Here is my finished result. I imagine I breathed a big sigh of relief when the pattern came together just as I planned.
Debbie
Like my Facebook page Traveling Quilter and get more updates on my quilting and my travels.


No comments:
Post a Comment
Note: Only a member of this blog may post a comment.